You can weld PE sheets for fire truck water tanks using a sheet butt fusion machine. Strong welds keep water tanks safe and reliable. You must always think about safety before you start. Wear the right safety gear and check your workspace for hazards. MM-Tech makes machines that help you work with safety in mind every step of the way. Many people also use pp sheet for tank projects because it is strong and durable.
Key Takeaways
Always put safety first by wearing safety gear and getting your workspace ready before you start welding.
Use the correct tools, like MM-Tech’s sheet butt fusion machine, to make sure your welds are strong and will last.
Clean and line up PE sheets the right way to stop leaks and make sure they fit tightly when you weld.
Check each weld after it cools to see if it is smooth and to look for any problems.
Take care of your welding machine often so it works well and makes strong joints.
Preparation and Safety for Butt Fusion Machine
Tools and Materials Checklist
You need to have the right tools before you start. Here is a list to help you get ready:
Butt fusion machine (MM-Tech machines work well)
PE sheets for fire truck water tanks
Extrusion welder (sometimes needed for some tanks)
Cleaning cloths and alcohol wipes
Measuring tape and marker
High-density locking clamps
Welding accessories (like angle devices and foot pedals)
Inspection tools (such as calipers and weld testers)
Tip: Always look at your tools for damage before starting. This helps you stop problems during butt fusion welding.
Personal Protective Equipment
Safety is very important when you do butt fusion welding. You must wear the right gear to stay safe. Here is what you need:
Equipment | Purpose |
|---|---|
Safety goggles | Keep your eyes safe |
Heat-resistant gloves | Protect your hands from burns |
Protective clothing | Keep your skin safe |
Safety shoes | Stop foot injuries |
Face mask | Keep from breathing in fumes |
Never skip your safety gear. It keeps you safe from burns, fumes, and other dangers.
Workspace Setup
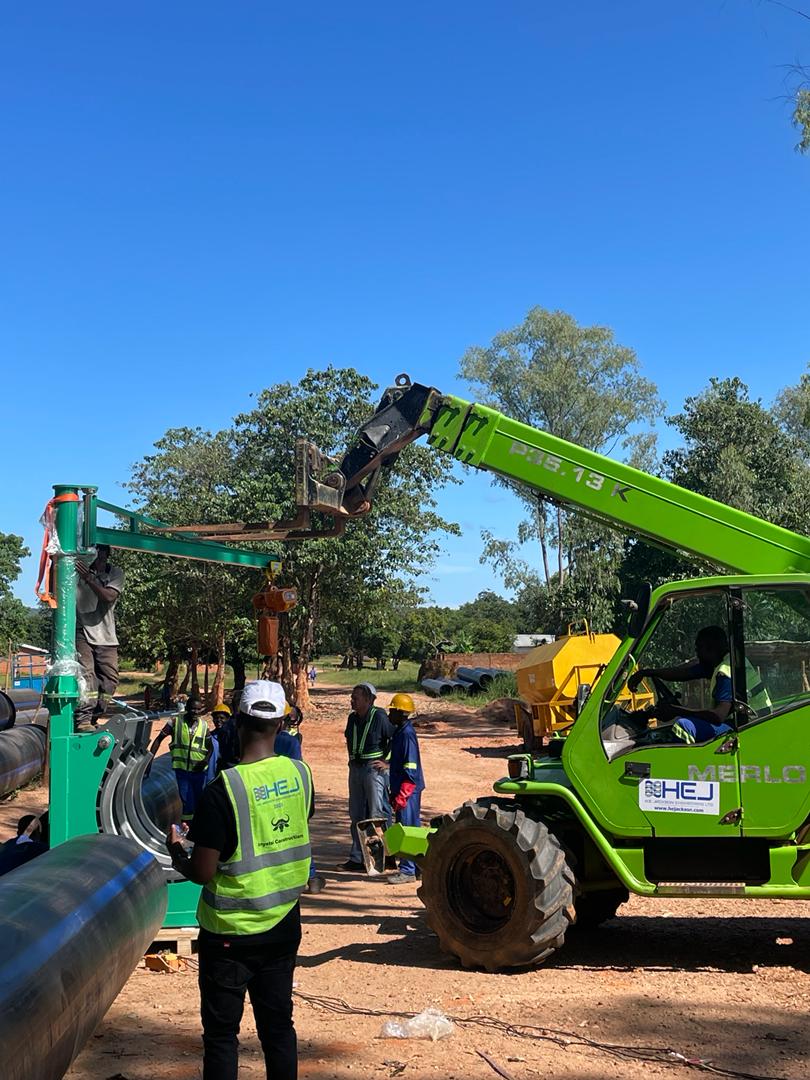
You need to set up your workspace for butt fusion welding. Clean the area and take away any mess. Make sure you have good lights and air flow. Put your butt fusion machine on a flat surface. Keep all your tools close by. Mark the welding area so you know where to work.
Note: MM-Tech makes machines with safety in mind. Their machines have things like even pressure and easy controls to help you work safely and well.
A clean and neat workspace helps you focus on safety and quality. You make fewer mistakes and build strong welds for your water tank.
Setting Up the Sheet Butt Fusion Machine
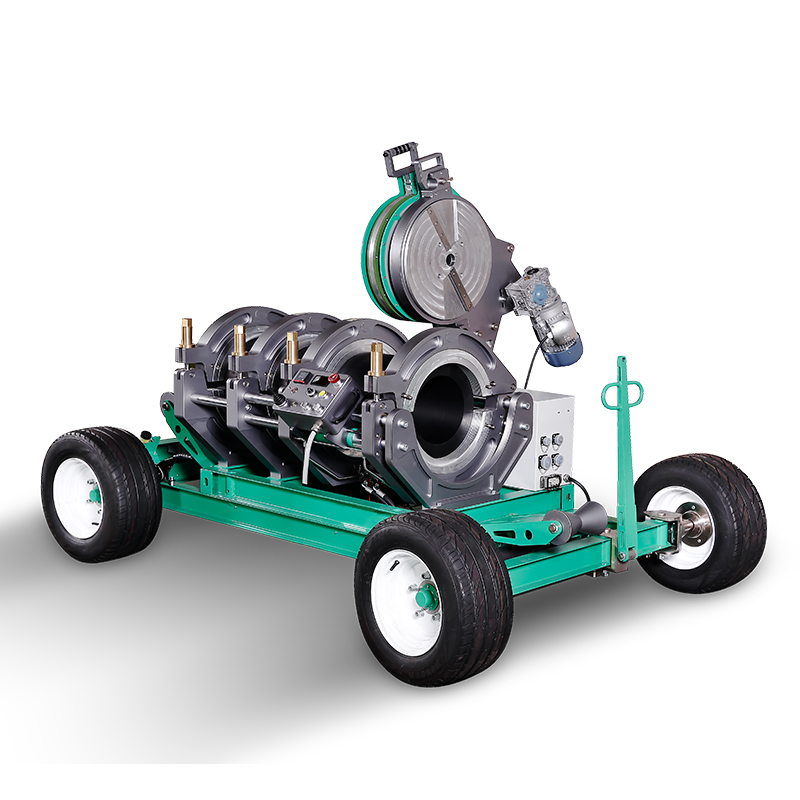
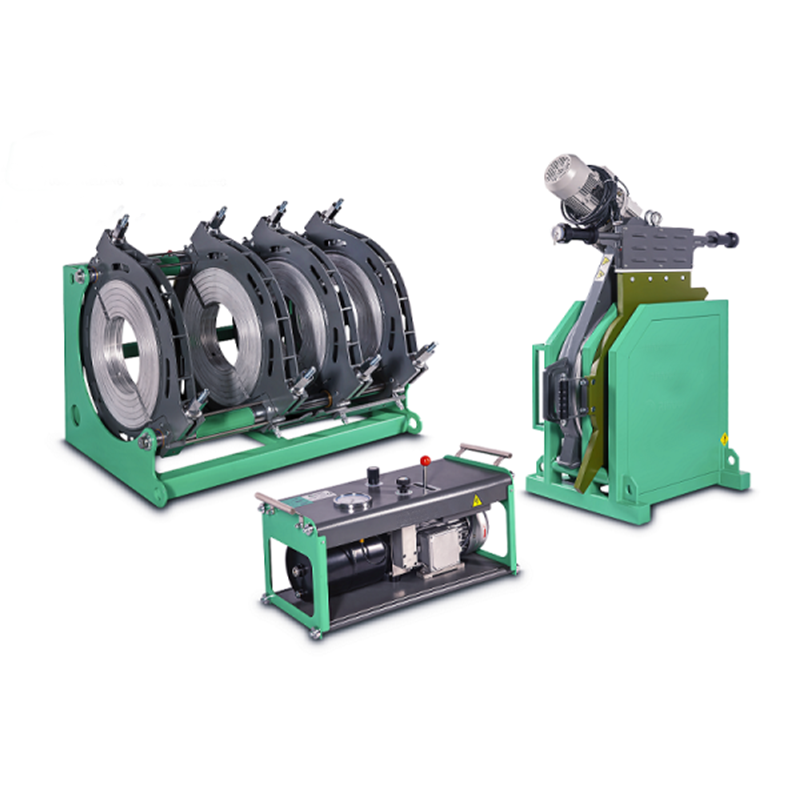
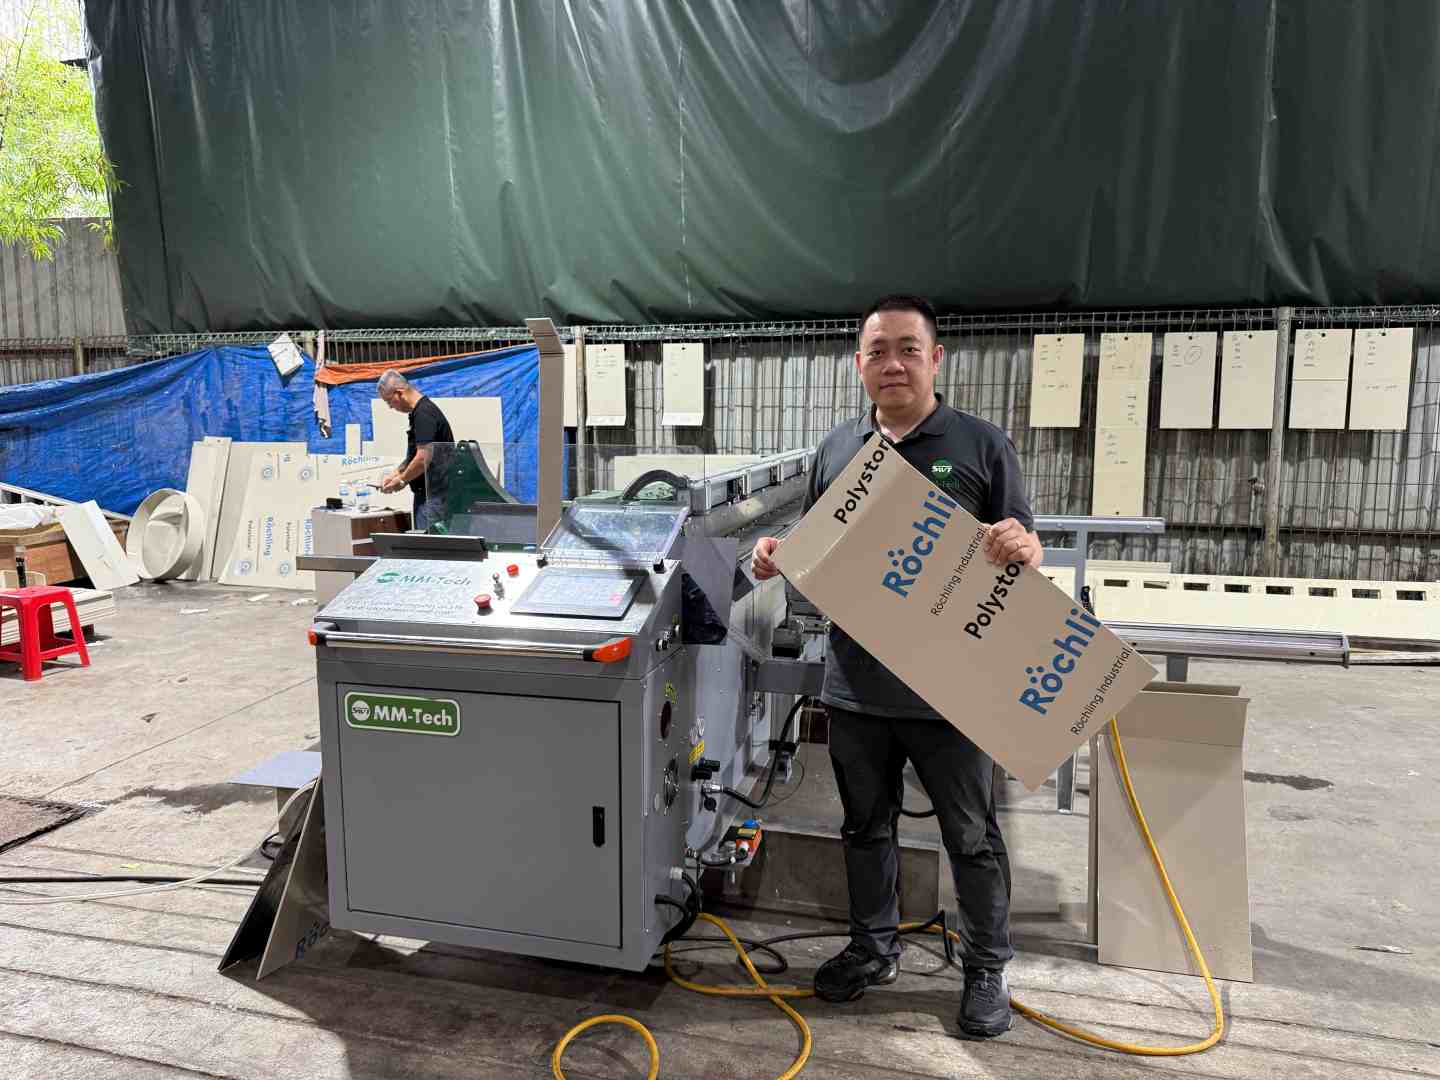
Choosing MM-Tech Equipment
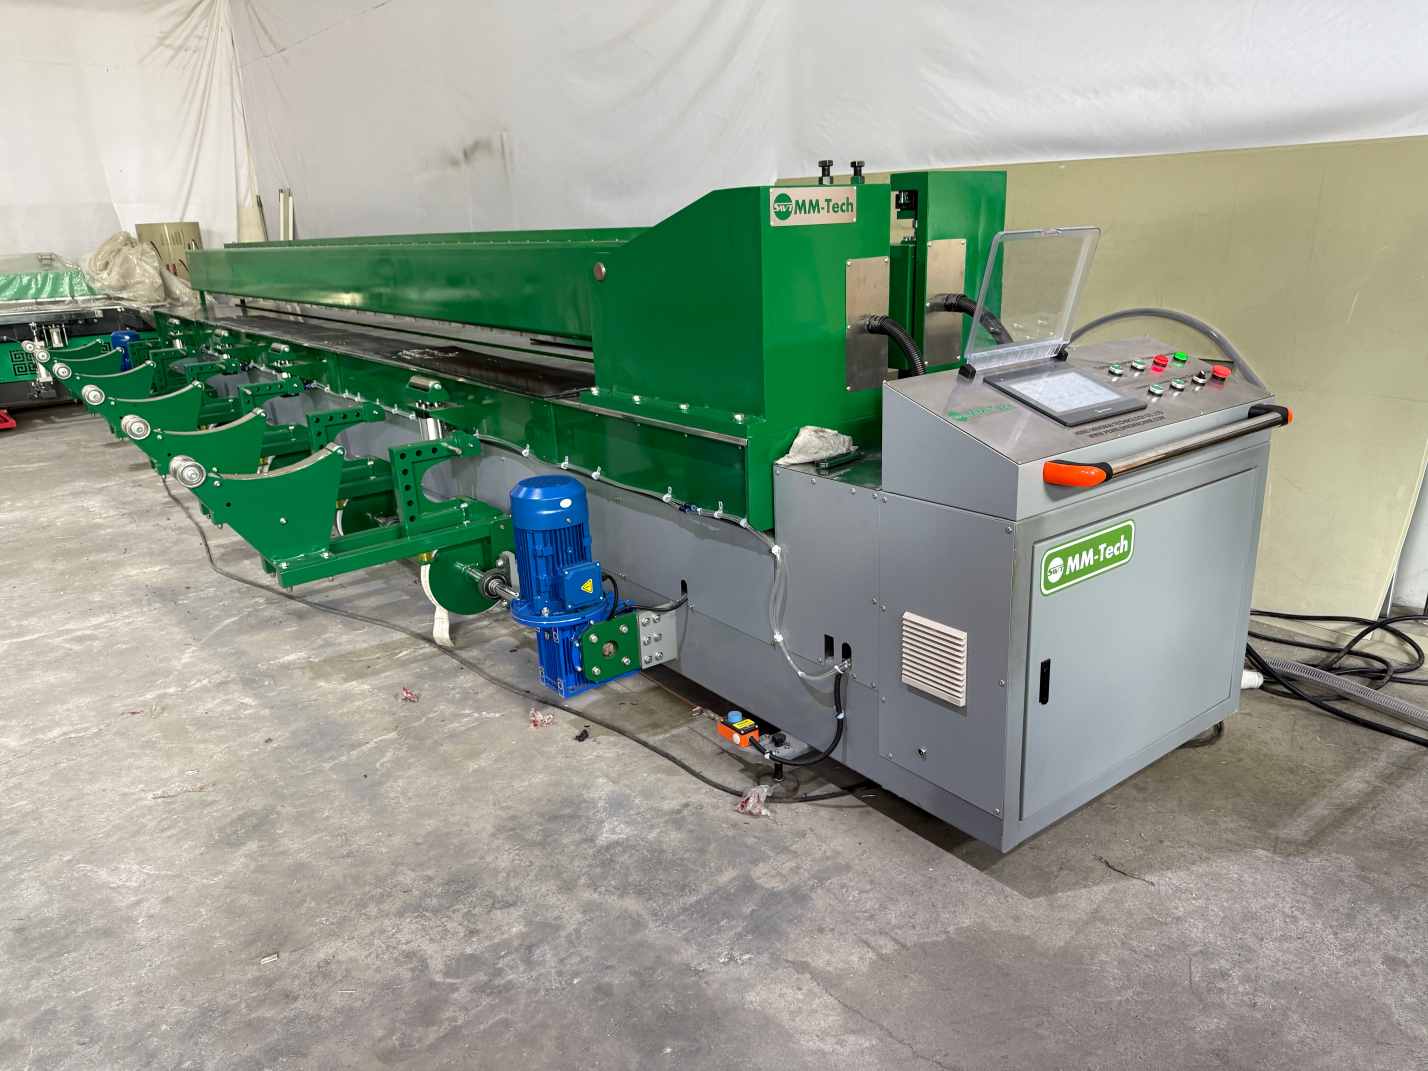
You need to pick the right welding machine for your project. MM-Tech has a sheet butt fusion machine that works with hdpe sheets. This machine makes strong welds that last a long time. You can use it with many thermoplastic sheets like hdpe, pp, pvc, and pvdf. The machine uses a special system to give even pressure on the weld. You can set the welding pressure and temperature for each material. The Siemens PLC control system is simple to use. You just press buttons and set what you need.
If you want your water tank to be stronger, use an extrusion welder. The extrusion welder helps you join corners and edges better. Use it after you finish welding with the sheet butt fusion machine. MM-Tech sells both types of welding machines for your job.
Tip: Choose a welding machine that fits the thickness and type of hdpe sheet you have. MM-Tech machines work with sheets from 3mm to 30mm thick.
Machine Assembly and Inspection
You need to put the welding machine together before you start. Place the butt fusion machine on a flat spot. Make sure it does not move or shake. Attach the clamps and check if they lock tight. Plug in the power and look at the Siemens PLC control panel. Check the welding machine for any broken or loose parts. Look at the heating plate and make sure it is clean. Check the pressure valve and see if it works right.
You must calibrate the welding machine for good welds. Calibration helps you set the right numbers for hdpe sheets. You need to check three main things:
Calibration Parameter | Importance | Notes |
|---|---|---|
Welding torch parameters | Must stay steady for good welds | Changes can affect heat and weld quality |
Needs control to keep the right heat | Speed changes the heat and how deep the weld goes | |
Cross-section geometry | Should stay the same for strong welds | If it changes, the weld may not be strong, especially in folded parts |
Keep the welding torch settings steady. Control the welding speed. Check the cross-section shape to make sure it is the same. These steps help you make strong welds for your hdpe water tank.
Note: MM-Tech makes each welding machine safe and easy to use. You get good results and easy calibration.
Adjusting Welding Parameters
You need to set the welding numbers before you start welding hdpe sheets. The main numbers are temperature, pressure, and cooling time. Change these numbers based on the sheet thickness and type. The Siemens PLC control system lets you set these numbers easily.
Here is a table with the best welding numbers for hdpe sheets:
Parameter | Value Range |
|---|---|
Temperature | 220°C to 260°C |
Pressure | Change for sheet size and thickness |
Cooling Time | 5 to 10 minutes |
Set the temperature between 220°C and 260°C. Change the pressure for the size and thickness of the HDPE sheet. Let the weld cool for 5 to 10 minutes. You must follow these numbers to get strong welds.
You can use the pe hot melt hydraulic butt welding machine for bigger HDPE sheets. This machine gives you more control over pressure and temperature. It works well for thick sheets and big water tanks.
Alert: Always check your welding numbers before you start. Wrong numbers can make weak welds and leaks.
You must use the welding machine for every step. Set the numbers, clamp the sheets, and start welding. Use the extrusion welder for extra joints if you need them. MM-Tech gives you all the tools for a safe and strong water tank.
Preparing and Aligning HDPE Sheets
Cleaning and Inspecting Edges
You must start with clean and smooth edges on your hdpe sheets. Dirt, oil, or dust can weaken the weld. Use a clean cloth and alcohol wipes to remove any debris from the edges. Always check the edges for cracks, chips, or uneven spots. If you see any damage, trim the edge with a sharp knife or a special edge trimmer. This step helps you get a strong bond when you weld hdpe sheets for water tanks or pe pipes.
Tip: Clean edges help you avoid leaks in your water tank. Never skip this step.
Inspect the thickness of each hdpe sheet. Use a caliper to measure and make sure the sheets match. If the thickness is not the same, the weld may not hold. You want every hdpe sheet to fit well with the next one. This is important for both flat sheets and curved parts of pe pipes.
Clamping and Alignment
Precise alignment is key for strong hdpe welds. Place the hdpe sheets into the butt fusion machine. Use high-density locking clamps to hold the sheets in place. The clamps stop the sheets from moving during welding. Make sure the edges of the hdpe sheets line up perfectly. Even a small gap can cause a weak spot in your water tank or pe pipes.
Here is a checklist for alignment:
Check that both hdpe sheets are flat and level.
Make sure the edges touch with no gaps.
Tighten the clamps evenly on both sides.
Double-check the alignment before you start welding.
Note: Good alignment means your hdpe weld will be strong and last a long time.
If you need to join corners or reinforce seams, you can use an extrusion welder after the main weld. This tool helps you add extra material to tricky spots, making your water tank or pe pipes even stronger.
A careful setup with clean, aligned hdpe sheets gives you the best results. You will build a water tank that holds up under pressure and lasts for years.
Welding Process with Sheet Butt Fusion Machine
You need to follow the right operation steps to get strong and reliable welds when using a sheet butt fusion machine. The welding process has several important instructions. You must pay attention to each detail for the best results.
Milling and Heating Steps
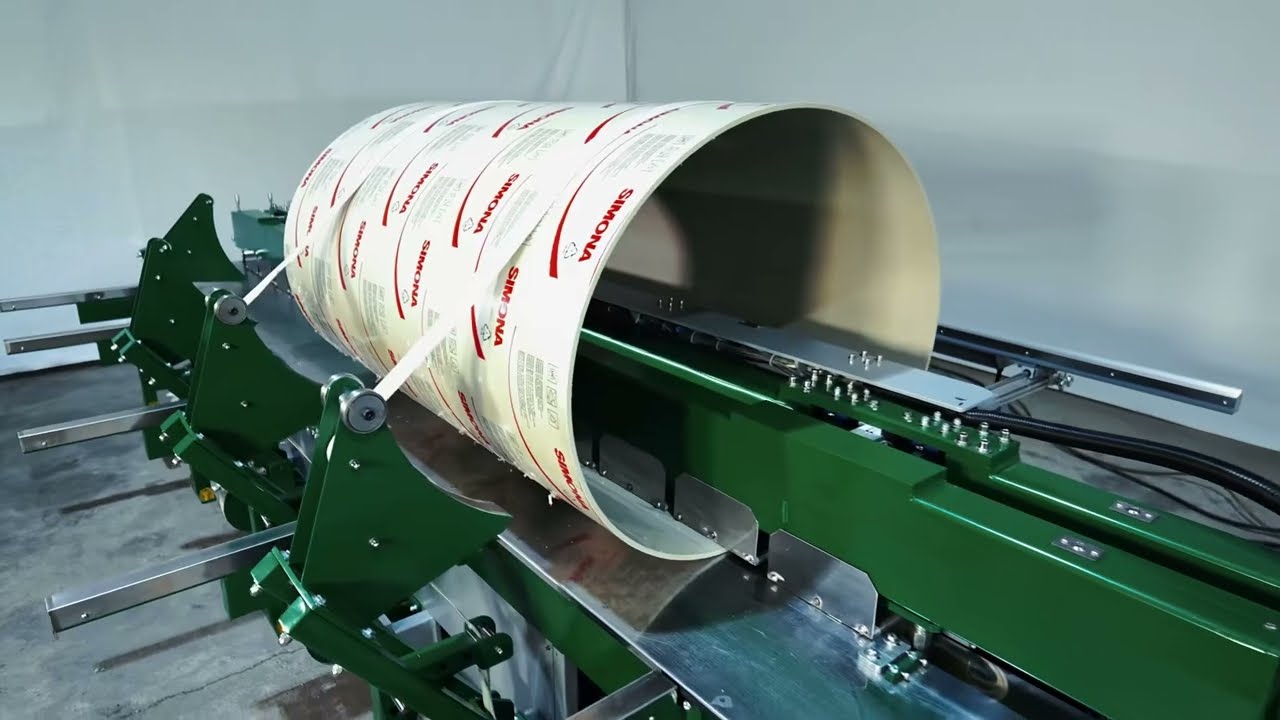
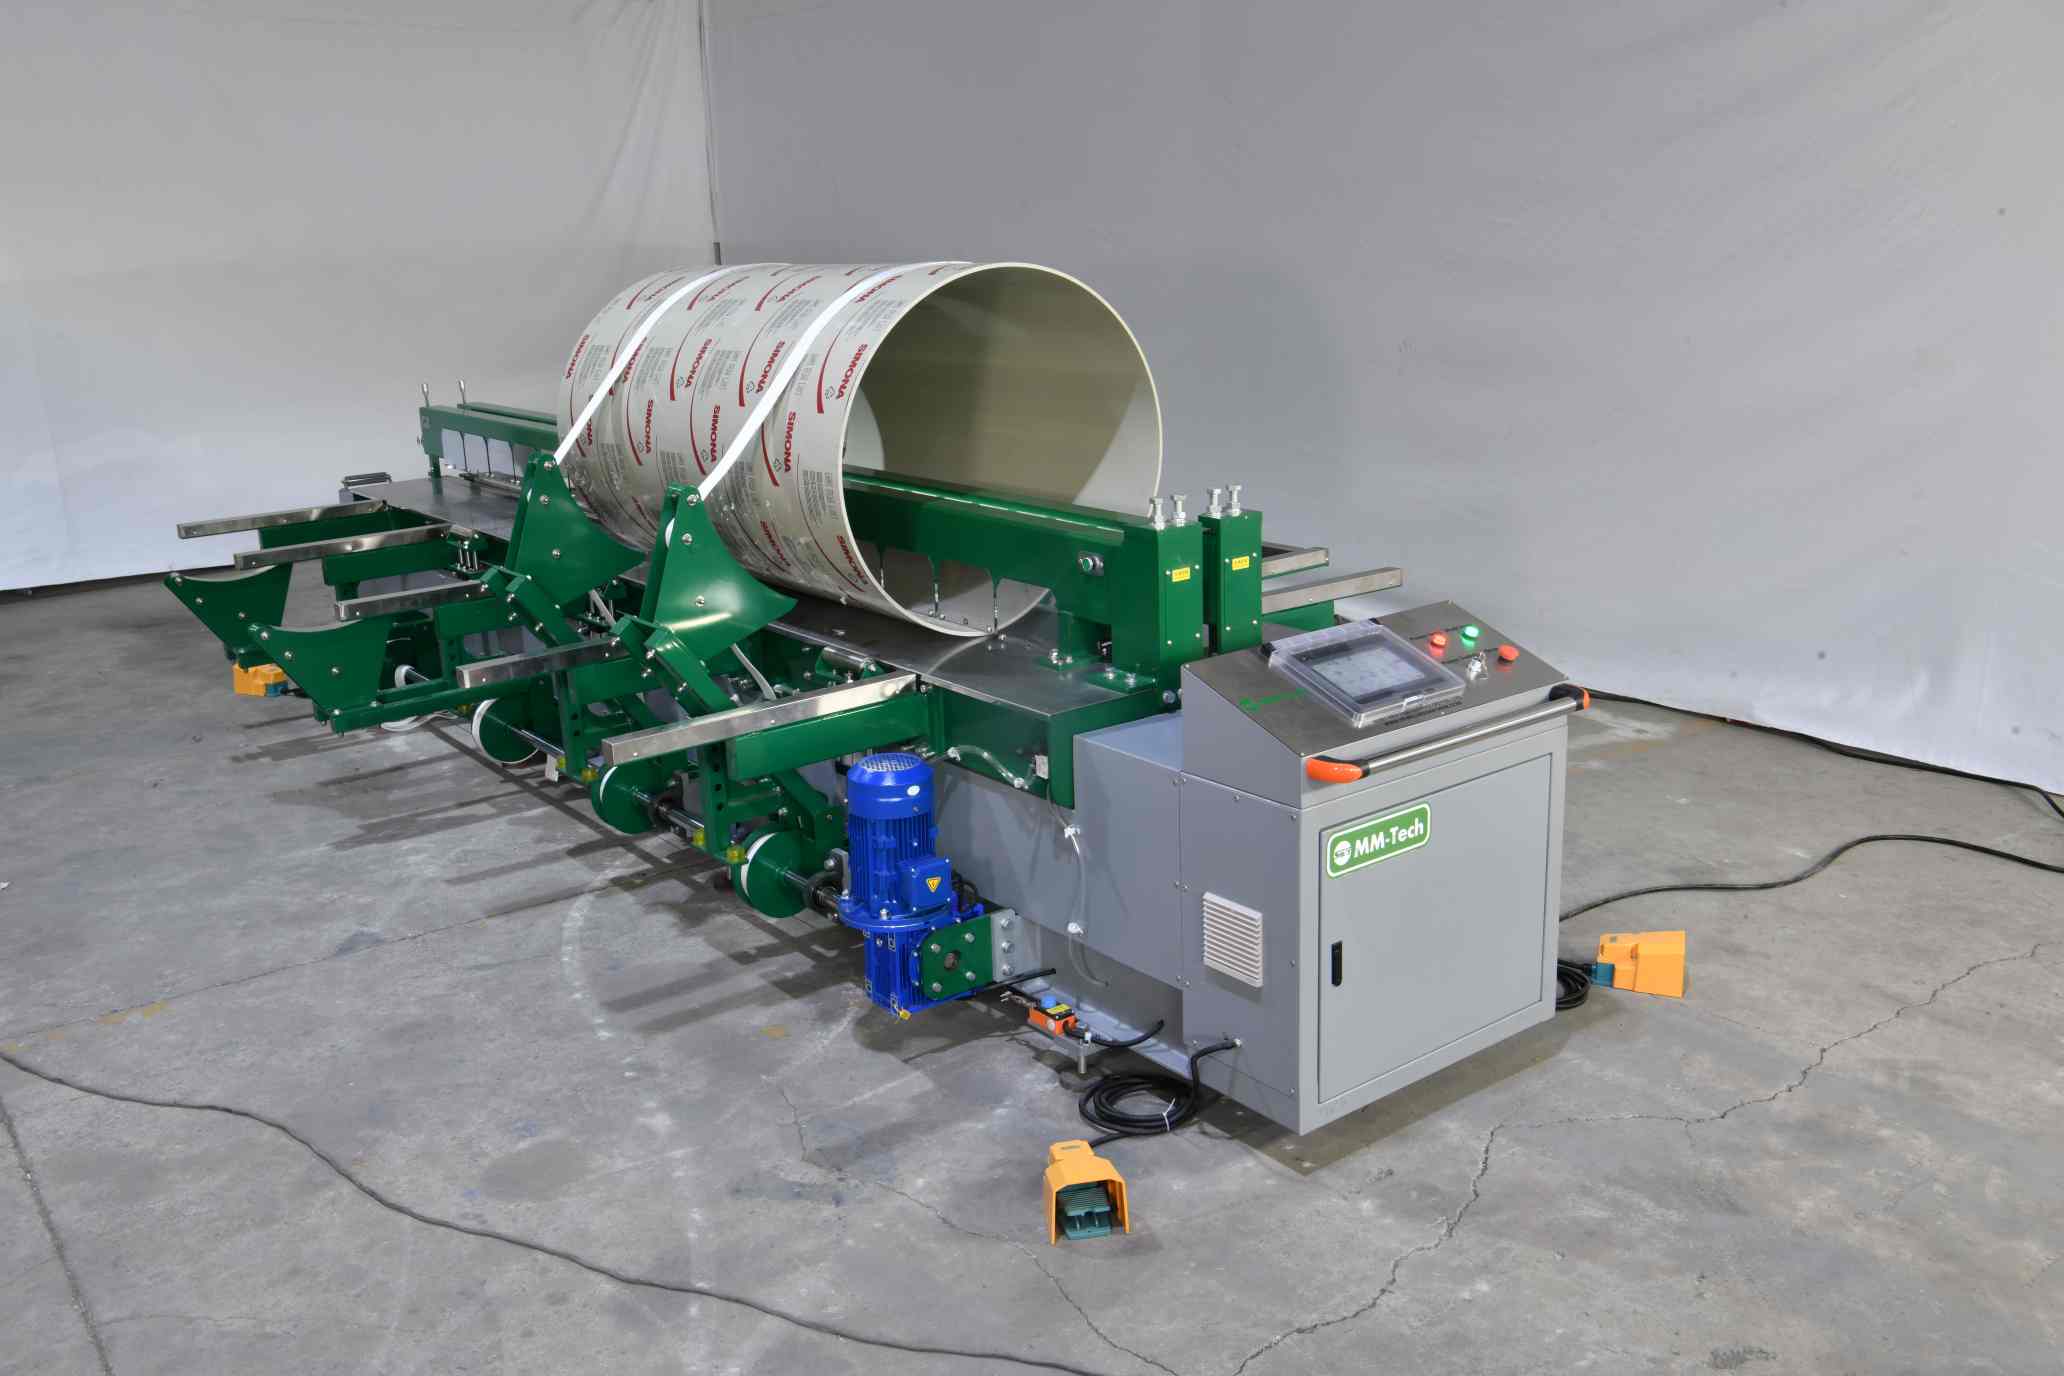
Start by placing your hdpe sheets into the welding machine. Make sure the sheets are clean and aligned. Lock them in place with the clamps. The first step is milling. The butt fusion machine uses a milling cutter to trim the edges of the hdpe sheets. This makes the edges smooth and flat. You must check that both sheets touch evenly after milling.
Next, move to the heating step. Set the heating plate on the welding machine to the right temperature. For hdpe sheets, you should use a temperature between 220°C and 260°C. This range helps the material melt evenly. The high pressure melting cycle presses the hdpe sheets against the heating plate. This ensures good contact. Then, the low pressure heating cycle lets the sheets absorb heat slowly. This step is important for a strong weld.
Follow these instructions for the heating cycle:
Set the heating plate to the correct temperature.
Press the hdpe sheets against the plate with high pressure.
Hold for the recommended time.
Switch to low pressure and let the sheets heat up fully.
You must watch the temperature and pressure closely. The welding machine from MM-Tech makes it easy to control these settings. If you use the wrong temperature or pressure, the weld will not be strong.
Joining and Cooling
After heating, remove the heating plate quickly. Bring the hdpe sheets together using the welding machine. Apply steady pressure so the melted edges join. This step forms the main weld. The butt fusion welding process needs you to keep the sheets pressed together for the right time.
Butt fusion of thermoplastic sheet, also known as heated element butt welding, has become a standard practice for many plastic fabricators as a result of the unmatched high quality of the welded joints. The process involves positioning the sheet material against a setting bar for alignment, clamping it in place, and using a heating element to melt the sheets. After a controlled melting cycle, the sheets are pressed together under high pressure to form a strong bond. The cooling cycle is critical, as it allows the molecular chains to intertwine while under pressure, ensuring a robust weld.
You must follow these instructions for joining and cooling:
Join the hdpe sheets right after removing the heating plate.
Keep the sheets under pressure using the welding machine.
Let the weld cool for 5 to 10 minutes. Do not move the sheets during this time.
The cooling time is very important. If you cool the weld too fast or too slow, the hdpe sheets may not be as strong. Cooling rates change the microstructure and toughness of the weld. You can use insulated covers to help control the cooling rate, especially if the room is hot or cold.
The sheet butt fusion machine from MM-Tech helps you manage each step. You get even pressure and the right temperature every time. If you need to make corners or reinforce seams, use an extrusion welder after the main weld. The extrusion welder adds extra material to tricky spots. This makes your water tank even stronger.
You must follow all instructions for the welding process. Use the right settings on your welding machine. Check each step as you go. This will help you build a water tank that lasts for years.
Inspection, Troubleshooting, and Maintenance
Checking Weld Quality
You must check every pipe joint after butt fusion welding. Inspection helps you find weak spots before you use the water tank. Look at the joints for smoothness and even color. Use a flashlight to see if there are gaps or bubbles. Run your finger along the joint to feel for rough spots. You can tap the pipe with a small tool to listen for hollow sounds. If you hear a hollow sound, the joint may not be strong. Use a caliper to measure the width of the joint. The width should match the rest of the pipe. Good inspection keeps your fire truck water tank safe and leak-free.
Common Issues in HDPE Pipe Welding
You may see problems in hdpe pipe welding. Some joints have porosity, slag inclusion, or lack of fusion. These issues can make the pipe weak. You must know how to fix them. Here is a table to help you:
Welding Defect Type | Incidence Rate | Troubleshooting / Maintenance Procedures |
|---|---|---|
Porosity | 26.7% | Improve operator skills, inspect materials, perform routine equipment maintenance |
Slag Inclusion | Critical | Use root cause analysis, focus on process control, apply preventive maintenance |
Lack of Fusion | Critical | Control welding methods, use Six Sigma DMAIC, check process parameters |
If you see porosity, check your skills and clean the pipe before welding. For slag inclusion, look at your process and keep the welding machine clean. Lack of fusion means you must check the temperature and pressure. Always follow the right steps for butt fusion welding. If you need to join tricky spots, use an extrusion welder. This tool lets you add material to the joint and fix leaks. You may choose extrusion welding for corners or repairs when butt fusion is not enough.
Machine Maintenance Tips
You must keep your welding machine in good shape. Clean the clamps and heating plate after every use. Check the pressure valve and control panel often. Lubricate moving parts so the machine works smoothly. Store the welding machine in a dry place. Write down every inspection and repair in a logbook. Good maintenance helps you make strong joints and keeps your pipe safe. Always follow safety rules when you work with pipes and joints. Regular care of your welding machine means your fire truck water tank will last longer.
You can build a strong fire truck water tank by following these steps with a sheet butt fusion machine. Always remember these key points:
Prepare your workspace and wear the right safety gear.
Set up the machine and check all parts before welding.
Clean and align the PE sheets for a tight fit.
Inspect each weld after cooling for smoothness and strength.
Choose MM-Tech for reliable welding solutions. Keep safety and regular maintenance as your top priorities. For extra strength at corners, use an extrusion welder.
FAQ
How do you weld PE sheets for fire truck water tanks?
You use a sheet butt fusion machine. Clean and align the sheets. Set the right temperature and pressure. Join the sheets and let them cool. This process creates strong welds for water tanks.
What safety gear should you wear during welding?
You need safety goggles, heat-resistant gloves, protective clothing, safety shoes, and a face mask. These items protect you from burns, fumes, and other hazards while you weld.
Can you use an extrusion welder for water tank projects?
Yes, you can use an extrusion welder to reinforce corners and seams. This tool adds extra material to tricky spots. It helps you build a stronger water tank.
How do you check weld quality after using a butt fusion machine?
Inspect the weld for smoothness and even color. Use a caliper to measure the joint. Look for gaps or bubbles. Good welds keep your water tank safe and leak-free.
What materials can you weld with MM-Tech machines?
You can weld PE, PP, PVC, PVDF, and thermoplastic pipes. MM-Tech machines work with many sheet types and thicknesses. You get reliable results for different projects.